5.3混淆矩阵
到目前为止,通过计算下列精确率百分比,我们对分类器进行评估:

有时,我们可能希望得到分类器算法的更详细的性能。能够详细揭示性能的一种可视化方法是引入一个称为混淆矩阵(confusion matrix)的表格。混淆矩阵的行代表测试样本的真实类别,而列代表分类器所预测出的类别。

它之所以名为混淆矩阵,是因为很容易通过这个矩阵看清楚算法产生混淆的地方。下面以女运动员分类为例来展示这个矩阵。假设我们有一个由100名女子体操运动员、100名WNBA篮球运动员及100名女子马拉松运动员的属性构成的数据集。我们利用10折交叉验证法对分类器进行评估。在10折交叉测试中,每个实例正好只被测试过一次。上述测试的结果可能如下面的混淆矩阵所示:

同前面一样,每一行代表实例实际属于的类别,每一列代表的是分类器预测的类别。因此,上述表格表明,有83个体操运动员被正确分类,但是却有17个被错分为马拉松运动员。92个篮球运动员被正确分类,但是却有8个被错分为马拉松运动员。85名马拉松运动员被正确分类,但是却有8个人被错分为体操运动员,还有16个人被错分为篮球运动员。
混淆矩阵的对角线给出了正确分类的实例数目。

上述表格中,算法的精确率为:

通过观察上述矩阵很容易了解分类器的错误类型。在本例当中,分类器在区分体操运动员和篮球运动员上表现得相当不错,而有时体操运动员和篮球运动员却会被误判为马拉松运动员,马拉松运动员有时被误判为体操运动员或篮球运动员。

一个编程的例子
回到上一章当中提到的来自卡内基梅隆大学的汽车MPG数据集,该数据集的格式如下:
下面试图基于气缸的数目、排水量(立方英寸)、功率、重量和加速时间预测汽车的MPG。我将所有392个实例放到mpgData.txt文件中,然后编写了如下的短Python程序,该程序利用分层采样方法将数据分到10个桶中(数据集及Python代码都可以从网站guidetodatamining.com下载)。
import random
def buckets(filename, bucketName, separator, classColumn):
  """the original data is in the file named filename
  bucketName is the prefix for all the bucket names
  separator is the character that divides the columns
  (for ex., a tab or comma) and classColumn is the column
  that indicates the class"""

  # put the data in 10 buckets
  numberOfBuckets = 10
  data = {}
  # first read in the data and divide by category
  with open(filename) as f:
    lines = f.readlines()
  for line in lines:
    if separator != '\t':
      line = line.replace(separator, '\t')
    # first get the category
    category = line.split()[classColumn]
    data.setdefault(category, [])
    data[category].append(line)
  # initialize the buckets
  buckets = []
  for i in range(numberOfBuckets):
    buckets.append([])
  # now for each category put the data into the buckets
  for k in data.keys():
    #randomize order of instances for each class
  random.shuffle(data[k])
  bNum = 0
  # divide into buckets
  for item in data[k]:
    buckets[bNum].append(item)
    bNum = (bNum + 1) % numberOfBuckets
  # write to file
  for bNum in range(numberOfBuckets):
    f = open("%s-%02i" % (bucketName, bNum + 1), 'w')
    for item in buckets[bNum]:
      f.write(item)
    f.close()

buckets("mpgData.txt", 'mpgData','\t',0)
执行上述代码会产生10个分别为mpgData01、mpgData02… mpgData10的文件。

能否修改上一章中近邻算法的代码,以使test函数能够在刚刚构建的10个文件上进行10折交叉验证(该数据集可以从网站guidetodatamining.com下载)?
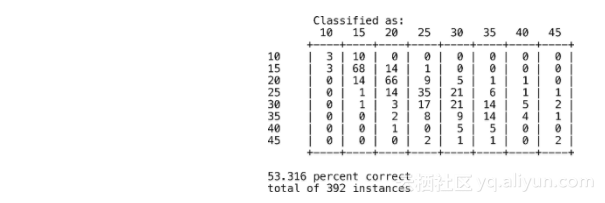
你的程序应该输出类似如下矩阵的混淆矩阵:
.
该解答只涉及如下方面:
修改initializer方法以便从9个桶中读取数据;
加入一个新的方法对一个桶中的数据进行测试;
加入一个新的过程来执行10折交叉验证过程。
下面依次来考察上述修改。
initializer方法的签名看起来如下:
def __init__(self, bucketPrefix, testBucketNumber, dataFormat):
每个桶的文件名类似于mpgData-01、mpgData-02,等等。这种情况下,bucketPrefix将是“mpgData”,而testBucketNumber是包含测试数据的桶。如果testBucketNumber为3,则分类器将会在桶1、2、4、5、6、7、8、9、10上进行训练。dataFormat是一个如何解释数据中每列的字符串,比如:
"class num num num num num comment"
它表示第一列代表实例的类别,下面5列代表实例的数值型属性,最后一列会被看成注释。
新的初始化方法的完整代码如下:
import copy

class Classifier:
  def __init__(self, bucketPrefix, testBucketNumber, dataFormat):

    """ a classifier will be built from files with the bucketPrefix
    excluding the file with textBucketNumber. dataFormat is a
    string that describes how to interpret each line of the data
    files. For example, for the mpg data the format is:
    "class num  num  num  num  num  comment"
    """
    self.medianAndDeviation = []

    # reading the data in from the file
    self.format = dataFormat.strip().split('\t')
    self.data = []
    # for each of the buckets numbered 1 through 10:
    for i in range(1, 11):
      # if it is not the bucket we should ignore, read the data
      if i != testBucketNumber:
        filename = "%s-%02i" % (bucketPrefix, i)
        f = open(filename)
        lines = f.readlines()
        f.close()
        for line in lines:
          fields = line.strip().split('\t')
          ignore = []
          vector = []
          for i in range(len(fields)):
            if self.format[i] == 'num':
              vector.append(float(fields[i]))
            elif self.format[i] == 'comment':
              ignore.append(fields[i])
            elif self.format[i] == 'class':
              classification = fields[i]
          self.data.append((classification, vector, ignore))
  self.rawData = copy.deepcopy(self.data)
  # get length of instance vector
  self.vlen = len(self.data[0][1])
  # now normalize the data
  for i in range(self.vlen):
    self.normalizeColumn(i)
testBucket方法
下面编写一个新的方法来测试一个桶中的数据。
def testBucket(self, bucketPrefix, bucketNumber):
  """Evaluate the classifier with data from the file
  bucketPrefix-bucketNumber"""

  filename = "%s-%02i" % (bucketPrefix, bucketNumber)
  f = open(filename)
  lines = f.readlines()
  totals = {}
  f.close()
  for line in lines:
    data = line.strip().split('\t')
    vector = []
    classInColumn = -1
    for i in range(len(self.format)):
      if self.format[i] == 'num':
        vector.append(float(data[i]))
      elif self.format[i] == 'class':
        classInColumn = i
    theRealClass = data[classInColumn]
    classifiedAs = self.classify(vector)
    totals.setdefault(theRealClass, {})
    totals[theRealClass].setdefault(classifiedAs, 0)
    totals[theRealClass][classifiedAs] += 1
  return totals
它以bucketPrefix和bucketNumber为输入,如果前者为“mpgData”、后者为3的话,测试数据将会从文件mpgData-03中读取,而testBucket将会返回如下格式的字典:
{'35':   {'35': 1, '20': 1, '30': 1},
 '40':   {'30': 1},
 '30':   {'35': 3, '30': 1, '45': 1, '25': 1},
 '15':   {'20': 3, '15': 4, '10': 1},
 '10':   {'15': 1},
 '20':   {'15': 2, '20': 4, '30': 2, '25': 1},
 '25':   {'30': 5, '25': 3}}
字典的键代表的是实例的真实类别。例如,上面第一行表示真实类别为35mpg的实例的结果。每个键的值是另一部字典,该字典代表分类器对实例进行分类的结果。例如行
'15':
`javascript
{'20': 3, '15': 4, '10': 1},
表示实际为15mpg的3个实例被错分到20mpg类别中,而有4个实例被正确分到15mpg中,1个实例被错分到10mpg中。

10折交叉验证的执行流程
最后,我们需要编写一个过程来实现10折交叉验证。也就是说,我们要构造10个分类器。每个分类器利用9个桶中的数据进行训练,而将其余数据用于测试。
def tenfold(bucketPrefix, dataFormat):
results = {}
for i in range(1, 11):
c = Classifier(bucketPrefix, i, dataFormat)
t = c.testBucket(bucketPrefix, i)
for (key, value) in t.items():
results.setdefault(key, {})
for (ckey, cvalue) in value.items():
results[key].setdefault(ckey, 0)
resultskey += cvalue
# now print results
categories = list(results.keys())
categories.sort()
print( "n Classified as: ")
header = " "
subheader = " +"
for category in categories:
header += category + " "
subheader += "----+"
print (header)
print (subheader)
total = 0.0
correct = 0.0
for category in categories:
row = category + " |"
for c2 in categories:
if c2 in results[category]:
count = resultscategory
else:
count = 0
row += " %2i |" % count
total += count
if c2 == category:
correct += count
print(row)
print(subheader)
print("n%5.3f percent correct" %((correct * 100) / total))
print("total of %i instances" % total)
tenfold("mpgData", "class num num num num num comment")
运行上述程序会产生如下结果:
