Using Trapgen
You can download trapgen from here (there are alternative SNMP trap generators around, this is just as an example):
http://trapgen.trapreceiver.com/
Usage:
trapgen -d <destinationIpAddress:port>
-c <communityName>
-f <filename>
-g <trapType>
-h
-i <senderIP>
-m <timeout>
-o <senderOID>
-p a | h | b
-r <requestId>
-s <specificType>
-t <timestamp>
-v <oid> <type> <value>
Note: Either the -d <destination ip address> pair or the -f <input file> pair (which must contain a -d <destination ip address> pair) is mandandatory. Choosing -p will cause the trap to be printed to the screen, and will not send a trap to the specified destination.
example: trapgen -d 192.168.2.3
The above example will generate a trap that looks like this:
community: public
sender ip: current host ip
Sender OID: 1.3.6.1.4.1.2854
Trap Type: 6 (enterprise specific)
Specific Type: 1
Timestamp: system time value in timeticks
This trap will have an empty varbind list and will be sent to ip address 192.168.2.3 on port 162. The above values are the defaults (except the destination ip address 192.168.2.3). Use the various command line options to override these defaults.
Command Line Options
-d <destinationIpAddress:port>
This mandatory parameter specifies the destination IP address for the generated trap. However, if the -p option is chosen, no trap will go to the specifed IP address. The default destination port is 162. If you want to send the trap to a different port, you can specify the new port number by following the IP address with a colon followed by the port number. For example:
trapgen -d 10.1.1.1 (Sends a trap to IP address 10.1.1.1 port 162)
trapgen -d 10.1.1.1:8162 (Sends a trap to IP address 10.1.1.1 port 8162)
-c <communityName>
An optional parameter that modifies the value of the community name from the default value of "public" to the value specified
-f <filename>
You may store the parameter information in a text file. The text file should look like a series of command line options, with each option on a separate line. For example:
–mytrapfile.txt–
-d 123.45.67.89:1025
-c private
-o 1.3.6.1.4.1.1824
-i 199.8.7.6
-g 5
-s 23
-t 12445
-v 1.3.6.1.4.1.1824.1.0.0.1 STRING This is a string (you do not need quotes)
-v 1.3.6.1.4.1.1824.1.0.0.1 COUNTER 3345556
-v 1.3.6.1.4.1.1824.1.0.0.1 GAUGE 12343212
-v 1.3.6.1.4.1.1824.1.0.0.1 INTEGER 99
-v 1.3.6.1.4.1.1824.1.0.0.1 ADDRESS 100.200.123.111
-v 1.3.6.1.4.1.1824.1.0.0.1 OID 1.2.3.4.5.6.7.8.9
-v 1.3.6.1.4.1.1824.1.0.0.1 TIMETICK 2233121
trapgen -d 10.1.1.1 -f mytrapfile.txt
In addition to the options listed in the file, the command line options will also be processed. The command line options will override the file specified options (except varbind info which will accumulate).
-g <trapType>
An optional parameter that modifies the default trap type from enterprise specific (6) to the user specified trap type. Valid trap types are:
· 0 – cold start
· 1 – warm start
· 2 – link down
· 3 – link up
· 4 – authentication failure
· 5 – egp neighbor loss
· 6 – enterprise specific
-h
Prints a help message that lists these command line parameters and options
-i <senderIP>
This modifies the default send IP address. The default value is the currnent host IP address of the machine running trapgen.
-m <timeout>
Set the value for the timeout
-o <senderOID>
This modifies the default value of the NCOMTECH enterprise OID (1.3.6.1.4.1.2854) to the value specified.
-p a | h | b
This option prints the traps generated to the screen rather than sending them to the specified IP address. This helps you to review the contents of the trap you are expecting to receive at your trap receiving program. THis option has three methods of printing: a – ASCII, h – hexidecimal, and b for both.
-r <requestId>
This option sets the request ID to a value specified by the user. This value is otherwise generated by trapgen.
-s <specificType>
This option enables the user to specify the specific type for a trap. This value is usually defined in the MIBs.
-t <timestamp>
This replaces the default value of the current system time with the value specified by the user.
-v <oid> <type> <value>
<oid> is the MIB variable object identified (oid) for the instance variable specified by this option. The oid should match a valid leaf instance, and should match the type listed in this option if you are sending a valid trap.
<TYPE> is one of the following:
· STRING
· COUNTER
· GAUGE
· INTEGER
· ADDRESS
· OID
· TIMETICK
· HEX
<value> is the value to associate in the varbind
For example:
trapgen -d 10.1.1.1 -v 1.3.6.1.4.1.1824.1.0.0.1 STRING "Very High Temperature"
Note the use of quotes ("") to enclose the text which contains spaces.
SOSSE and NSM integration – SNMP
To configure Spotlight SQL Server Enterprise to integrate with a NMS using SNMP traps generated by trapgen.exe
1. Open Spotlight and select File -> Connect

2. In Connection Manager right click on an instance of SQL Server and select Properties.
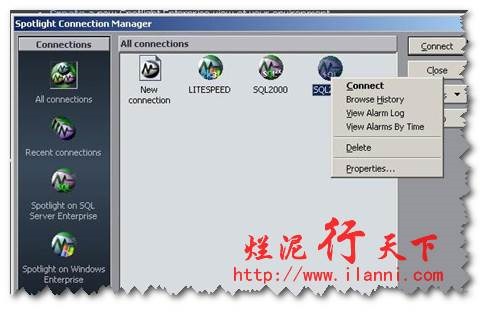
3. In Properties select Alarms

4. In Editing Alarms (select Click here to edit the default settings for all connections if required) select the relevant alarm i.e. Databases Unavailable and select Override the default settings for the rule. Select Run Program when the alarm is raised. Choose Select a Programto run. Adjust thresholds and severity as required.

5. Enter trapgen.exe and parameters in the Command Line box.
