一、Apache服务
Apache是Apache软件基金会的一个开放源码的网页服务器,是世界使用最广泛的Web服务端之一,译为阿帕奇;Apache具有优秀的性能,稳定性,是通过加载模块来提供各种功能。
1、主配置httpd.conf
1
2
3
4
5
6
7
8
9
10
11
12
13
14
15
16
17
18
19
20
|
ServerRoot #服务目录
ServerAdmin #管理员邮箱
user #运行服务的用户身份
group #运行服务的组身份
ServerName #网站服务器的域名
DocumentRoot #网页文档的根目录
Listen #监听的IP地址、端口号
PidFile #保存httpd进程PID号的文件
DirectoryIndex #默认的索引页文件
ErrorLog #错误日志文件的位置
CustomLog #访问日志文件的位置
LogLevel #记录日志的级别,默认为warn
Timeout #网络连接超时,默认为300秒
KeepAlive #http是否持续连接,可选On或Off
MaxKeepAliveRequests #保持一个连接的最大请求数
KeepAliveTimeout #断开连接前的时间
Include #需要包含进来的其他配置文件
<Directory /> #区域设置
……
</Directory>
|
#工作模式(默认Prefork)
1
2
3
4
5
6
7
8
9
10
11
12
13
14
15
16
17
|
<IfModule prefork.c>
StartServers 8 #默认启动8个httpd进程
MinSpareServers 5 #最小的空闲进程数
MaxSpareServers 20 #最大的空闲进程数,如果空闲进程数大于这个值,Apache会自动kill掉一些多余进程
ServerLimit 256 #服务器允许配置进程数的上限
MaxClients 256 #同时最多能发起256个访问,超过的要进入队列等待
MaxRequestsPerChild 4000 #每个进程启动的最大线程数,如达到限制数时进程将结束,如置为0则子线程永不结束
</IfModule>
<IfModule worker.c>
StartServers 4
MaxClients 300
MinSpareThreads 25
MaxSpareThreads 75
ThreadsPerChild 25
MaxRequestsPerChild 0
</IfModule>
|
2、虚拟主机配置
1>.基于域名虚拟主机
每个网站使用不同域名,对应IP地址和TCP端口相同,也是使用最多的
1
2
3
4
5
6
7
8
9
10
11
12
13
14
15
16
17
18
19
20
21
22
23
24
|
[root@www ~]# mkdir -p /var/www/test1.com /var/www/test2.com
[root@www ~]# echo "www.test1.com" > /var/www/test1.com/index.html
[root@www ~]# echo "www.test2.com" > /var/www/test2.com/index.html
[root@www ~]# vi /etc/httpd/conf/httpd.conf
ServerName 192.168.0.200:80 #设置本机IP地址,不设置会启动报错
NameVirtualHost *:80
<VirtualHost *:80>
ServerName www.test1.com
DocumentRoot /var/www/test1.com
ServerAlias test1.com
ErrorLog "/var/www/logs/test1.com-error_log"
CustomLog "/var/www/logs/test1.com-access_log" common
</VirtualHost>
<VirtualHost *:80>
ServerName www.test2.com
DocumentRoot /var/www/test2.com
ServerAlias test2.com
ErrorLog "/var/www/logs/test2.com-error_log"
CustomLog "/var/www/logs/test2.com-access_log" common
</VirtualHost>
[root@www ~]# service httpd restart
设置权限
[root@www~]# chmod -R 750 /var/www/test1.com/ /var/www/test2.com/
[root@www~]# chgrp -R apache /var/www/test1.com/ /var/www/test2.com/
|
http://www.test1/2.com #测试成功,没有dns服务器情况下,客户端需要做host记录
2>.基于IP虚拟主机
每个网站使用不同域名,不同IP,相同TCP端口 (配置多个IP,eth0:0表示网卡的第二个IP地址,依次0、1、2等添加更多IP地址)
1
2
3
4
5
6
7
8
9
10
|
[root@www~]# cd /etc/sysconfig/network-scripts/
[root@www network-scripts]# cp ifcfg-eth0 ifcfg-eth0:0
[root@www network-scripts]# vi ifcfg-eth0:0
DEVICE=eth0:0
TYPE=Ethernet
ONBOOT=yes
BOOTPROTO=static
IPADDR=192.168.0.200
GATEWAY=192.168.0.1
NETMASK=255.255.255.0
|
1
2
3
4
5
6
7
8
9
10
11
12
13
14
15
16
17
|
[root@www ~]# vi /etc/httpd/conf/httpd.conf
NameVirtualHost *:80
<VirtualHost 192.168.0.200:80>
ServerName www.test1.com
DocumentRoot /var/www/test1.com
ServerAlias test1.com
ErrorLog "/var/www/logs/test1.com-error_log"
CustomLog "/var/www/logs/test1.com-access_log" common
</VirtualHost>
<VirtualHost 192.168.0.201:80>
ServerName www.test2.com
DocumentRoot /var/www/test2.com
ServerAlias test2.com
ErrorLog "/var/www/logs/test2.com-error_log"
CustomLog "/var/www/logs/test2.com-access_log" common
</VirtualHost>
[root@www ~]# service httpd restart
|
3>.基于端口虚拟主机
每个网站相同域名,相同IP,不同端口
1
2
3
4
5
6
7
8
9
10
11
12
13
14
15
16
17
18
19
|
[root@www ~]# vi /etc/httpd/conf/httpd.conf
NameVirtualHost *:80
Listen 8080
Listen 8081
<VirtualHost *:8080>
ServerName www.test1.com
DocumentRoot /var/www/test1.com
ServerAlias test1.com
ErrorLog "/var/www/logs/test1.com-error_log"
CustomLog "/var/www/logs/test1.com-access_log" common
</VirtualHost>
<VirtualHost *:8081>
ServerName www.test2.com
DocumentRoot /var/www/test2.com
ServerAlias test2.com
ErrorLog "/var/www/logs/test2.com-error_log"
CustomLog "/var/www/logs/test2.com-access_log" common
</VirtualHost>
[root@www ~]# service httpd restart
|
3、基于用户的身份验证
1
2
3
4
5
6
7
8
9
10
11
12
13
14
15
|
[root@www ~]# vi /etc/httpd/conf/httpd.conf
<VirtualHost *:80>
DocumentRoot /var/www/test.com
ServerName www.test.com
ServerAlias test1.com
ErrorLog "/var/www/logs/test.com-error_log"
CustomLog "/var/www/logs/test.com-access_log" common
<Directory "/var/www/html">
AuthName "Please input Password" #保护领域的提示信息
AuthType basic #定义使用认证方式,basic或digest
AuthUserFile /etc/httpd/.passwd #指定认证口令文件的位置
#Require user user1 #授权给指定的一个或多个用户,也可以是一个组:Require group 组名
Require valid-user #授权给认证口令文件的所有用户
</Directory>
</VirtualHost>
|
4、创建用户及密码,此处密码与用户的系统密码无关
1
2
3
4
5
|
[root@www ~]# htpasswd -c /etc/httpd/.htpasswd user1
New password:
Re-type new password:
Adding password for user user
[root@www ~]# service httpd restart
|
5、基于客户端地址访问控制,主要应用在区域<Directory >……</Directory>
Order配置项,定义控制顺序
1>.先允许后拒绝,默认拒绝所有:Order allow,deny
2>.先拒绝后允许,默认允许所有:Order deny,allow
Allow、Deny配置项,设置允许或拒绝的IP地址、主机名
1>.Deny from address1 address2 …
2>.Allow from address1 address2 …
1
2
3
4
5
6
7
8
9
10
11
12
13
14
|
[root@www ~]# vi /etc/httpd/conf/httpd.conf
NameVirtualHost 192.168.0.200
<VirtualHost *:80>
DocumentRoot /var/www/test.com
ServerName www.test.com
ServerAlias test1.com
ErrorLog "/var/www/logs/test.com-error_log"
CustomLog "/var/www/logs/test.com-access_log" common
<Directory "/var/www/html">
order allow,deny
allow from 192.168.1.0/24 #all允许所有
</Directory>
</VirtualHost>
[root@www ~]# service httpd restart
|
6、Apache下301转向代码(需要开启mod_rewrite)
1>.将不带www的域名转向到带abc的域名下
1
2
3
4
|
Options +FollowSymLinks
RewriteEngine on
RewriteCond %{HTTP_HOST} ^www.test.com [NC]
RewriteRule ^(.*)$ http://abc.www.test.com
|
2>.重定向到新域名
1
2
3
|
Options +FollowSymLinks
RewriteEngine on
RewriteRule ^(.*)$ http://www.test.com/$1 [L,R=301]
|
3>.使用正则进行301转向,网站实现伪静态
1
2
3
|
Options +FollowSymLinks
RewriteEngine on
RewriteRule ^news-(.+)\.html$ news.php?id=$1 #将news.php?id=123这样的地址转向到news-123.html
|
7、Apache下虚拟主机配置301跳转
为实现URL规范化,SEO通常将不带www的域名转向到带www域名,vhosts.conf中配置为:
1
2
3
4
|
ServerName www.test.com
DocumentRoot /var/www/html
ServerName test.com
RedirectMatch permanent ^/(.*) http://www.test.com/$1
|
二、Nginx服务
Nginx (“engine x”) 是一个高性能的 HTTP 和 反向代理服务器,也是一个 IMAP/POP3/SMTP代理服务器
1、apache与nginx优缺点
1>.apache对客户端的响应是支持并发的,运行守护进程后,会产生多个子进程/线程,每个子进程/线程分别对客户端请求进行响应。
2>.apache可以提供静态和动态服务,通常使用php模块来实现,mod_php5或叫apxs2。
3>.apache缺点:工作方式是基于多进程模式,每个用户请求就会创建一个子进程/线程来响应,如果并发请求非常多的时候,就会占用极多的系统资源CPU和内存,因此在并发量大情况下,apache并不是优势。
4>.nginx稳定性和低系统资源消耗的特点,并发连接的高处理能力(单台物理服务器可支持30000~50000个并发请求),nginx采用异步服务器模式,异步服务器事件驱动模式,用户并发请求只需一个进程或几个线程,因此占用的系统资源也相对非常少,比如,10000的并发连接请求,nginx只需要几十M的内存,而apache可能需要几百M的内存。
5>.nginx没有内置的模块来对PHP进行支持,而是通过第三方FastCGI模块来支持处理。
2、安装Nginx
1
2
3
4
5
6
7
8
|
[root@www ~]# yum -y install pcre-devel zlib-devel
[root@www ~]# useradd -M -s /sbin/nologin nginx
[root@www ~]# tar zxvf nginx-1.4.2.tar.gz
[root@www ~]# cd nginx-1.4.2
[root@www nginx-1.4.2]# ./configure --prefix=/usr/local/nginx \
--user=nginx --group=nginx --with-http_stub_status_module
[root@www nginx-1.4.2]# make && make install
[root@www nginx-1.4.2]# ln -s /usr/local/nginx/sbin/nginx /usr/local/sbin/ #设置软链接,方便使用
|
3、常用命令
1
2
3
|
nginx -t :检测配置文件语法是否正确
nginx :启动nginx服务
killall -9 nginx :关闭nginx服务
|
4、编写nginx启动 停止 重启等SysV管理脚本,方便使用
1
2
3
4
5
6
7
8
9
10
11
12
13
14
15
16
17
18
19
20
21
22
23
24
25
26
27
28
29
30
|
[root@www ~]# vi /etc/init.d/nginx
#!/bin/bash
# chkconfig: 345 99 20
# description: Nginx service control script
PROG="/usr/local/nginx/sbin/nginx"
PIDF="/usr/local/nginx/logs/nginx.pid"
case "$1" in
start)
$PROG
echo "Nginx service start success."
;;
stop)
kill -s QUIT $(cat $PIDF)
echo "Nginx service stop success."
;;
restart)
$0 stop
$0 start
;;
reload)
kill -s HUP $(cat $PIDF)
echo "reload Nginx config success."
;;
*)
echo "Usage: $0 {start|stop|restart|reload}"
exit 1
esac
[root@www ~]# chmod +x /etc/init.d/nginx
[root@www ~]# chkconfig --add nginx
[root@www ~]# chkconfig nginx on
|
5、主配置文件nginx.conf
全局配置
1
2
3
4
|
user nobody; #默认运行用户,可以编译时指定
worker_processes 1; #启动工作进程数,一般是cpu的两倍
error_log logs/error.log; #错误日志位置
pid logs/nginx.pid; #pid文件位置
|
I/O事件配置
1
2
3
|
events {
worker_connections 1024; #每个进程允许的最大连接数
}
|
HTTP配置
1
2
3
4
5
6
7
8
9
10
11
12
13
14
15
16
17
18
19
20
21
22
23
24
25
26
27
28
|
http {
include mime.types; #设置mime类型(conf/mime.types)
default_type application/octet-stream;
#设置日志格式
log_format main '$remote_addr - $remote_user [$time_local] "$request" '
'$status $body_bytes_sent "$http_referer" '
'"$http_user_agent" "$http_x_forwarded_for"';
access_log logs/access.log main; #访问日志位置
sendfile on; #支持文件发送、下载
keepalive_timeout 65; #连接保持超时时间
gzip on; #开启gzip动态压缩
#配置虚拟主机
server {
listen 80;
server_name localhost; #设置域名
charset utf8; #设置网页默认字符集
access_log logs/host.access.log main; #访问日志
location / {
root html; #网页根目录位置,默认在安装目录html下
index index.html index.htm; #网站首页
}
error_page 404 /404.html; #访问网页不存在或删除,返回的页面
error_page 500 502 503 504 /50x.html;内部错误返回页面
location = /50x.html {
root html;
}
}
}
|
6、虚拟主机配置
1
2
3
4
5
6
7
8
9
10
11
12
13
|
[root@www nginx]# vi /usr/local/nginx/conf/nginx.conf #在http{}添加包含虚拟主机配置
include /usr/local/nginx/vhost/*.conf;
[root@www nginx]# vi /usr/local/nginx/conf/vhost/test1.com.conf #创建虚拟主机配置文件
server {
listen 80;
server_name www.test1.com test1.com; #设置域名
charset utf8; #设置网页默认字符集
access_log logs/test1.com.log main; #访问日志
location / {
root /usr/local/nginx/html/test1.com; #网页根目录位置
index index.html index.htm; #网站首页
}
}
|
7、Nginx域名重定向
1
2
3
4
5
6
7
|
server {
listen 80;
server_name www.test.com test.com;
location / {
rewrite "^/(.*)$"http://bj.test.com;
}
}
|
8、Nginx网站目录跳转域名
1
2
3
4
5
6
|
server {
listen 80;
server_name www.test.com test.com;
location / {
rewrite ^/Login/login.html http://www.test.com;
}
|
9、Nginx虚拟目录并设置用户认证
1
2
3
4
5
6
7
8
9
10
11
|
location ~ /stats{
root /usr/local/nginx/html/;
location ~ \.php$ {
fastcgi_pass 127.0.0.1:9000;
fastcgi_index index.php;
fastcgi_param SCRIPT_FILENAME /usr/local/nginx/html/$fastcgi_script_name;
include fastcgi_params;
}
auth_basic "说明信息";
auth_basic_user_file /usr/local/nginx/.htpasswds;
}
|
10、Nginx伪静态配置(wordpress或discuz)
1
2
3
4
5
6
7
|
server {
listen 80;
server_name www.yngx.net yngx.net;
if(!-e $request_filename)
{
rewrite ^/(.*)$ /index.php?p=$1 last;
}
|
11、配置FastCGI支持PHP网页
1
2
3
4
5
6
7
8
9
10
11
12
13
14
15
16
17
18
19
20
21
22
23
24
25
26
27
28
29
30
31
|
#安装gd库
[root@www ~]# yum install -y gd freetype freetype-devel libpng libpng-devel libjpeg* libxml2 libxml2-devel openssl openssl-devel
[root@www php-5.4]# tar zxvf php-5.4.tar.gz
[root@www php-5.4]# ./configure --prefix=/usr/local/php \
-with-config-file-path=/usr/local/php/etc \
-with-gd --with-zlib --with-iconv --enable-zip --enable-pdo \
-enable-xml --with-openssl --with-curl --enable-bcmath --enable-ftp \
-enable-mbstring --enable-fpm --with-fpm-user=nginx \
-with-fpm-group=nginx
[root@www php-5.4]# make && make install
[root@www php-5.4]# cp php.ini-production /usr/local/php/etc/php.ini
[root@www php-5.4]# cp sapi/fpm/init.d.php-fpm /etc/rc.d/init.d/php-fpm
[root@www php-5.4]# chmod +x /etc/rc.d/init.d/php-fpm
[root@www nginx]# cd /usr/local/nginx
[root@www nginx]# cp etc/php-fpm.conf.default /usr/local/php/etc/php-fpm.conf #复制php-fpm配置模板
[root@www nginx]# vi etc/php-fpm.conf
user = nginx
group = nginx
pid = run/php-fpm.pid
pm.start_server = 20 #启动时开启进程数
pm.min_spare_servers = 5 #最小空闲进程数
pm.max_spare_servers = 35 #最多空闲进程数
[root@www php-5.4]# service php-fpm start
[root@www php-5.4]# chkconfig php-fpm on
[root@www php-5.4]# vi /usr/local/nginx/conf/nginx.conf #访问php页面配置段,去掉以下注释
location ~ \.php$ { root html;
fastcgi_pass 127.0.0.1:9000;
fastcgi_index index.php;
fastcgi_param SCRIPT_FILENAME /usr/local/nginx/html$fastcgi_script_name; #SCRIPT_FILENAME后面写网站根目录
include fastcgi_params;
}
|
测试:
1
2
3
4
|
[root@www nginx]# vi html/index.php
<? php
phpinfo();
?>
|
三、AWStats+JAWStats日志分析工具
Awstats是一款基于Perl的WEB日志分析工具,而JAWStats是一款基于PHP的统计套件,旨在为Awstats提供更为精美图形界面。
JAWStats 是一个用来统计网站日志的工具,在 AWStats 的基础上生成更加清晰的关于网站访问数据的图表、表格。
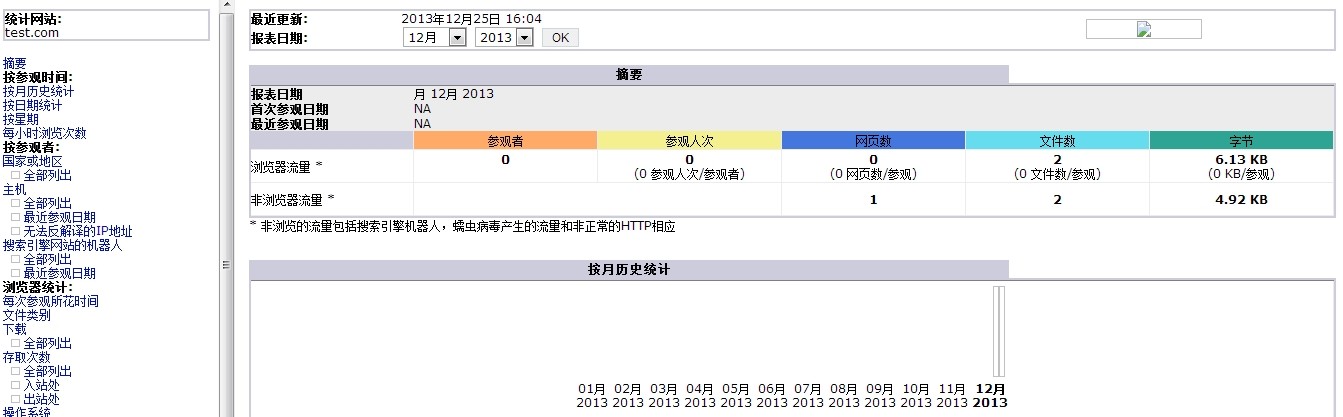
它可以统计您站点的如下信息:
1>.访问量,访问次数,页面浏览量,点击数,数据流量等
2>.精确到每月、每日、每小时的数据
3>.访问者国家
4>.访问者IP
5>.Robots/Spiders的统计
6>.访客持续时间
7>.对不同Files type 的统计信息
8>.Pages-URL的统计
9>.访客操作系统浏览器等信息
10>.其它信息(搜索关键字等等)
1、安装配置AWStats
下载:http://www.awstats.org/#DOWNLOAD
1
2
3
4
5
6
7
|
[root@www ~]# tar zxvf awstats-7.2.tar.gz
[root@www ~]# mv awstats-7.2 /usr/local/awstats
[root@www ~]# chown -R root.root /usr/local/awstats/
[root@www ~]# chmod +x /usr/local/awstats/tools/*.pl
[root@www ~]# chmod +x /usr/local/awstats/wwwroot/cgi-bin/*.pl
[root@www ~]# cd /usr/local/awstats/tools/
[root@www tools]# ./awstats_configure.pl #向导工具,生成网站配置文件
|
1>.输入 none 然后回车
2>.输入 y 确认创建配置文件
3>.输入配置文件名称,一般输入域名。
4>.配置文件使用默认路径 /etc/awstats
5>.按回车继续
6>.按回车完成配置文件的创建
1
2
3
4
5
6
7
8
|
[root@www tools]# vi /etc/awstats/awstats.www.test.com.conf
LogFile=LogFile="/var/log/httpd/access_log" #修改统计网站的日志文件路径
DirData="/var/lib/awstats" #默认日志信息统计数据库
[root@www tools]# mkdir /var/lib/awstats #创建统计数据库
[root@www tools]# perl /usr/local/awstats/wwwroot/cgi-bin/awstats.pl -update -config=www.test.com #为指定网站生成数据
[root@www tools]# /usr/local/awstats/tools/awstats_updateall.pl now #为所有网站生成数据
[root@www tools]# crontab -e #设置定时运行日志分析程序
* */1 * * * /usr/local/awstats/tools/awstats_updateall.pl now
|
添加apache支持awstats参数
1
2
3
4
5
6
7
8
9
10
11
12
13
|
[root@www ~]# vi /etc/httpd/conf/httpd.conf
Alias /awstatsclasses "/usr/local/awstats/wwwroot/classes/"
Alias /awstatscss "/usr/local/awstats/wwwroot/css/"
Alias /awstatsicons "/usr/local/awstats/wwwroot/icon/"
ScriptAlias /awstats/ "/usr/local/awstats/wwwroot/cgi-bin/"
<Directory "/usr/local/awstats/wwwroot">
Options None
AllowOverride None
Order allow,deny
Allow from all
</Directory>
[root@www ~]# service httpd restart
[root@www ~]# chmod 755 -R /usr/local/awstats
|
测试访问:http://192.168.0.102/awstats/awstats.pl?config=www.test.com

2、安装配置JAWStats
下载:http://www.jawstats.com/download
1
2
3
4
5
6
7
8
9
10
11
12
13
14
15
16
17
18
19
20
21
22
23
24
25
|
[root@www ~]# mkdir /usr/local/jawstats
[root@www ~]# tar zxvf jawstats-0.7beta.tar.gz -C /usr/local/jawstats
[root@www ~]# cd /usr/local/jawstats/
[root@www jawstats]# cp config.dist.php config.php
[root@www jawstats]# vi config.php
<?php
// core config parameters
$sDefaultLanguage = "zh-cn"; #设置默认语言
$sConfigDefaultView = "thismonth.all"; #默认按月显示
$bConfigChangeSites = true; #是否可以更换站点
$bConfigUpdateSites = true; #是否可以更新统计数据
$sUpdateSiteFilename = "xml_update.php";
// individual site configuration
$aConfig["www.test.com"] = array( #web站点域名
"statspath" => "/var/lib/awstats", #awstats统计数据目录
"updatepath" => "/usr/local/awstats/wwwroot/cgi-bin/awstats.pl", #用于更新统计数据
"siteurl" => "http://www.test.com", #点击首页标题前往的地址
"sitename" => "www.test.com", #首页标题
"theme" => "default",
"fadespeed" => 250,
"password" => "123456", #更新统计数据输入的密码
"includes" => "",
"language" => "zh-cn"
);
?>
|
3、添加中文语言包
下载:http://www.jawstats.com/src/languagepack.zip
1
2
3
4
|
[root@www jawstats]# cd /usr/local/jawstats/languages/
[root@www languages]# rm -rf ./*
[root@www languages]# unzip languagepack.zip
[root@www languages]# rm -rf languagepack.zip
|
4、配置虚拟目录用户认证访问
1
2
3
4
5
6
7
8
9
|
[root@www ~]# vi /etc/httpd/conf/httpd.conf
Alias /tongji "/usr/local/jawstats"
<Directory "/usr/local/jawstats">
Options Indexes MultiViews
AuthType Basic
AuthName "Please Login"
AuthUserFile /etc/httpd/.passwd
Require valid-user
</Directory>
|
5、测试
http://www.test.com/tongji
时间: 2025-01-26 17:46:56