OpenCASCADE Shape Location
eryar@163.com
Abstract. The TopLoc package of OpenCASCADE gives resources to handle 3D local coordinate systems called Locations. A Location is a composition of elementary coordinate systems, each one is called a Datum. The Location keeps track of this composition. The paper will use the Draw Test Harness to illustrate the Location concept.
Key Words. Transformation, Location, Local Coordinate Systems
1.Introduction
对于三维空间中的各种模型,总是想要摆放到合适的位置,最终形成一个工厂的模型,一艘船的模型,一个建筑物的模型,等等。目前来看,所有的几何相关的库对模型变换的实现一般都是使用了矩阵变换。有的可能只保留了最终变换的结果矩阵数据,而OpenCASCADE的TopoDS_Shape中保留了Location信息。从其文档可以看出,Location中保留了模型变换一系列的变换组合,并可以对这个变换进行Track追踪。如何来正确理解这个Location的意义呢?下面结合Draw Test Harness来进行说明。
2.Draw Test
在Draw Test Harness中对模型进行变换的命令有:ttranslate, trotate, tmove, reset, tmirror, tscale.其中ttranslate, trotate, tmove, reset命令只会对模型位置进行调整,并不能让模型发生变形,即是刚性变换。下面就通过对一个Box进行移动和旋转,来看看TopoDS_Shape中的Location是如何变化的。在Draw Test Harness中输入以下命令:
pload ALL
box b 10 20 30
vdisplay b
vtrihedron vt
dump b
可以看到此时box的Location是没有的:
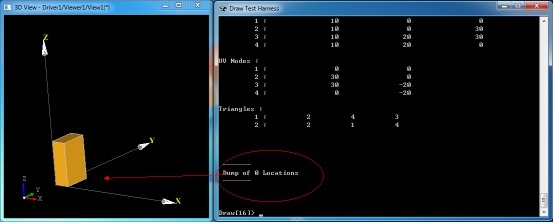
Figure 2.1 Box Location in Original
当将box沿X方向移动一段距离后:
# translate by x direction
ttranslate b 10 0 0
vdisplay b
dump b
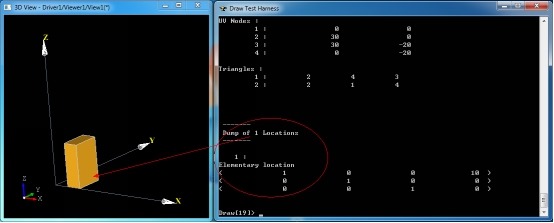
Figure 2.2 Location of the translation box
由上图可知,当对模型进行变换后,TopoDS_Shape中即有了Location数据,变换矩阵的平移部分(第4列数据)发生了变化。下面继续沿X轴方向移动10:
# translate by x direction
ttranslate b 10 0 0
vdisplay b
dump b
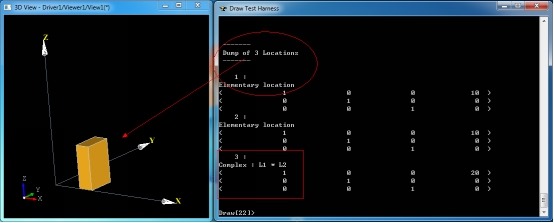
Figure 2.3 Translate Box in X Direction
由图2.3可知,模型现在的位置是通过两个Elementary变换得来的。最后一个Complex变换是上述所有变换的复合。下面再对模型进行绕Y轴旋转45度:
# rotate by y axis
trotate b 0 0 0 0 1 0 45
vdisplay b
dump b
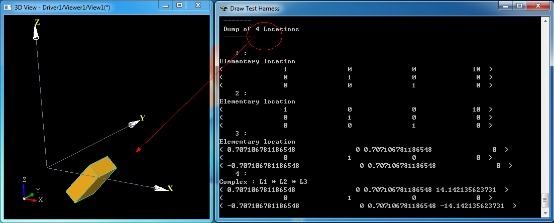
Figure 2.4 Rotate the Box
由上图可知,经过旋转变换后的模型有了4个Location:三个基本变换和一个复合变换,复合变换是所有基本变换的组合。
通过上面的示例,已经可以清晰理解OpenCASCADE中的Location的概念,虽然处理得有点复杂,通过Location可以对模型的变换轨迹有个详细的跟踪。这样处理的好处就是对模型的变换过程进行了记录,可以方便地回到历史上的任意一个时刻;不好的地方就是程序理解起来麻烦,而且还需要有额外的内存来保存这些数据。
以下为上述所有Tcl脚本:
#
# test TopoDS_Shape location.
# Shing Liu(eryar@163.com)
# 2016-09-06 22:50
#
pload ALL
# initialize
box b 10 20 30
vdisplay b
vtrihedron vt
dump b
# translate by x direction
ttranslate b 10 0 0
vdisplay b
dump b
# translate by x direction
ttranslate b 10 0 0
vdisplay b
dump b
# rotate by y axis
trotate b 0 0 0 0 1 0 45
vdisplay b
dump b
3.Draw Code
每个Draw Test Harness命令都可以方便地找到其实现代码,其中模型变换命令的实现代码如下:
//=======================================================================
// transform
//=======================================================================
static Standard_Integer transform(Draw_Interpretor& ,Standard_Integer n,const char** a)
{
if (n <= 1) return 1;
gp_Trsf T;
Standard_Integer last = n;
const char* aName = a[0];
Standard_Boolean isBasic = Standard_False;
if (!strcmp(aName,"reset")) {
}
else {
isBasic = (aName[0] == 'b');
aName++;
if (!strcmp(aName,"move")) {
if (n < 3) return 1;
TopoDS_Shape SL = DBRep::Get(a[n-1]);
if (SL.IsNull()) return 0;
T = SL.Location().Transformation();
last = n-1;
}
else if (!strcmp(aName,"translate")) {
if (n < 5) return 1;
T.SetTranslation(gp_Vec(Draw::Atof(a[n-3]),Draw::Atof(a[n-2]),Draw::Atof(a[n-1])));
last = n-3;
}
else if (!strcmp(aName,"rotate")) {
if (n < 9) return 1;
T.SetRotation(gp_Ax1(gp_Pnt(Draw::Atof(a[n-7]),Draw::Atof(a[n-6]),Draw::Atof(a[n-5])),
gp_Vec(Draw::Atof(a[n-4]),Draw::Atof(a[n-3]),Draw::Atof(a[n-2]))),
Draw::Atof(a[n-1])* (M_PI / 180.0));
last = n-7;
}
else if (!strcmp(aName,"mirror")) {
if (n < 8) return 1;
T.SetMirror(gp_Ax2(gp_Pnt(Draw::Atof(a[n-6]),Draw::Atof(a[n-5]),Draw::Atof(a[n-4])),
gp_Vec(Draw::Atof(a[n-3]),Draw::Atof(a[n-2]),Draw::Atof(a[n-1]))));
last = n-6;
}
else if (!strcmp(aName,"scale")) {
if (n < 6) return 1;
T.SetScale(gp_Pnt(Draw::Atof(a[n-4]),Draw::Atof(a[n-3]),Draw::Atof(a[n-2])),Draw::Atof(a[n-1]));
last = n-4;
}
}
if (T.Form() == gp_Identity || isBasic) {
TopLoc_Location L(T);
for (Standard_Integer i = 1; i < last; i++) {
TopoDS_Shape S = DBRep::Get(a[i]);
if (S.IsNull())
{
std::cerr << "Error: " << a[i] << " is not a valid shape\n";
return 1;
}
else
DBRep::Set(a[i],S.Located(L));
}
}
else {
BRepBuilderAPI_Transform trf(T);
for (Standard_Integer i = 1; i < last; i++) {
TopoDS_Shape S = DBRep::Get(a[i]);
if (S.IsNull()) {
std::cerr << "Error: " << a[i] << " is not a valid shape\n";
return 1;
}
else {
trf.Perform(S);
if (!trf.IsDone())
return 1;
DBRep::Set(a[i],trf.Shape());
}
}
}
return 0;
}
对模型的变换主要使用类BRepBuilderAPI_Transform来完成。
4.Conclusion
通过上面的示例,已经可以清晰理解OpenCASCADE中的Location的概念,虽然处理得有点复杂,通过Location可以对模型的变换轨迹有个详细的跟踪。这样处理的好处就是对模型的变换过程进行了记录,可以方便地回到历史上的任意一个时刻;不好的地方就是程序理解起来麻烦,而且还需要有额外的内存来保存这些数据。
理解了Location的概念,也就理解了OpenCASCADE的Brep文件中的一项基本内容,方便开发一些转换接口。
关于矩阵变换在图形学中的应用可以参考《3D数学基础:图形与游戏开发》。
5.References
1.Fletcher Dunn, Ian Parberry. 3D Math Primer for Graphics and Game Development. 清华大学出版社. 2005
2.OpenCASCADE Draw Test Harness User Guide.
PDF Version: OpenCASCADE Shape Location